Including Making Text Boxes & Adding Graphics
1. Log onto the network, make a new Word file.
2. On Menu Bar --> File --> Save As, name the file (i.e. Inside) and save it in the appropriate folder.
Before you go on, think about what you have to do - you want to make a 3 column file that will print sideways (landscape).
3. Set up Stuff:
On Menu Bar --> File --> Page SetUp.
Look at the Orientation icon and click the sideways icon
Click OK
On Menu Bar --> Format --> Document
Change margins (Top, Bottom, Left & Right) to .5
Click OK
On Menu Bar --> Format --> Columns.
Under Presets select 3 (all other values will fill in automatically, click OK
Do this so that you can move from column to column easily:
Your cursor should be at the top left of your file (in column 1)
On Menu Bar --> Insert --> Break --> Column break (Notice that your cursor has popped over to the 2nd column)
Repeat, on Menu Bar --> Insert --> Break --> Column break (Notice that your cursor has popped over to the 3rd column)
SAVE
NOTE: All work should be placed in text boxes. Do NOT type text without first making your text box. See next section.
Adding Text Box:
1. On Menu Bar --> Insert --> Text Box
2. Your cursor will now be the crosshair cursor (i.e. it looks like a "+" sign). Click and drag to create your text box.
3. Type in your information.
4. If you wish to add "color", Menu Bar --> Format --> Text Box to shade (Fill) and outline (Line).
5. Save
Adding Pictures:
NOTE: Before adding your picture, you should use the Graphic Converter reference sheet to reduce the memory size.
ALL PICTURES WILL BE ADDED INSIDE A TEXT BOX
1. All pictures should be already saved as files (if you have not done this, use the Graphics - Saving from the Web reference sheet).
2. Make a text box (Menu Bar --> Insert --> Text Box) where you want your picture to go.
3. Be sure your cursor is inside the text box, then on Menu Bar --> Insert --> Picture --> From File
Resizing & Moving Pictures:
1. Click on the picture once, if necessary (you must see the handles around the picture)
2. Go to a handle in one of the corners, click and drag toward the center of the picture to reduce the size
3. To move your picture first select the text box (click on the outside edge of the text box), move your cursor onto the text box (it should look like a hand), then click and drag it to a new location
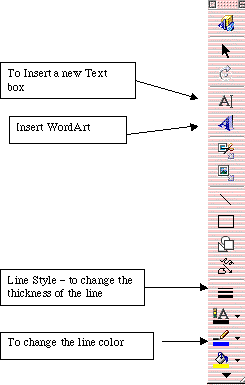
Adding Draw Features:
Use Word Art and other options on the Drawing toolbar (on Menu Bar --> View --> Toolbars --> Drawing) to enhance your final product.